SCS.1m
Advanced Audio Setup
Mixer Channel Order
The Stanton SCS1d is pre-assigned to offer 2 channel mixer orders. By default VirtualDJ will launch at decks 3-1-2-4 (decks 1 and 2 in the middle) and the Stanton SCS1m knobs, faders and buttons will follow this order.
Alternatively a channel order 1-2-3-4 can be used. Click on the Mixer Options button, right above the Crossfader in the 4 decks default GUI of VirtualDJ and select the 1-2-3-4 option. The knobs, faders and buttons of the SCS1m will automatically follow this order.
The option 1-3-4-2 is not pre-defined and it is advised not be selected.
Inputs
The Stanton SCS1d offers 2 stereo inputs at the rear side and both can be routed and used by VirtualDJ. The Microphone Input is already included in the pre-defined audio configuration and can be controlled and recorded from VirtualDJ.
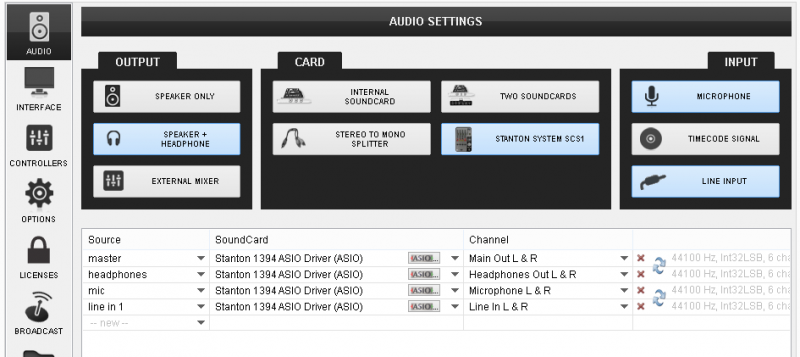
The Line Input can be used to route external audio sources (CD player, turntable etc) though a VirtualDJ deck. In that case an additional line with linein 1 needs to be manually added to the audio configuration (AUDIO tab of Config) as per the following image.
.

Once the audio configuration is applied, use the AUX buttons from the default 2 or 4 decks GUI to route the input to any of the available decks.
Timecode
The single Line Input of the Stanton SCS1m offers the ability to use a single timecode device (timecode CD or Timecode Vinyl) as a DVS system.
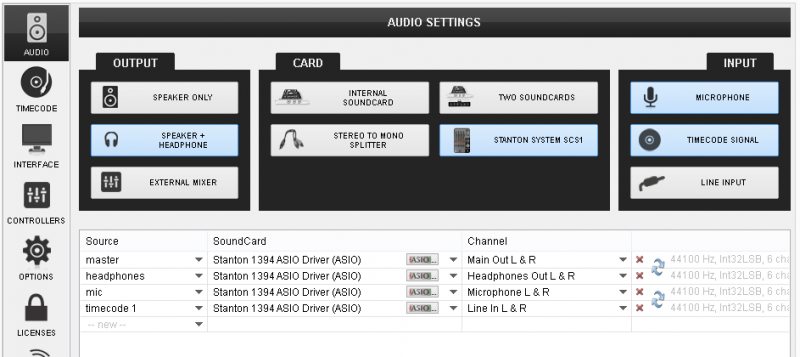
Connect your CD player or turntable with the Timecode signal and then manually add a timecode line to the audio configuration, as per the following image.

Once the audio configuration is applied, enable the timecode control to any of the available decks using the TC buttons from the 2 or 4 decks default GUIs of VirtualDJ.
Note. In theory, the Microphone Input can be used as well as a second Timecode Input, however it is not recommended.


