DDJ-RZ
Advanced Audio Options
Pioneer DDJ-RZ offers a variety of Inputs and Operation modes. The unit can operate both as MIDI and a stand-alone hardware mixer at the same time, allowing mixing from analogue media sources (CD Players, Turntables etc) connected to one of the 4 available inputs at the rear panel, along with the ability to use a Computer DJ Application.
MIXER CHANNELS
Channel 3 (far left) :
Audio signal from an analogue line level source (such as a standard CD Player) connected to the CH 3 LINE inputs at the rear panel can be inserted and processed by the mixer when the switcher at the top panel is set to Line position.
Audio signal from an analogue turntable source connected to the CH 3 PHONO inputs at the rear panel can be inserted and processed by the mixer when the switcher at the top panel is set to Phono position.
Audio signal from VirtualDJ Deck 3 can be routed to this Channel when the switcher at the top panel is set to USB position.
Channel 1 (middle-left) :
Audio signal from an analogue line level source (such as a standard CD Player) connected to the CH 1 LINE inputs at the rear panel can be inserted and processed by the mixer when the switcher at the top panel is set to Line position.
Audio signal from VirtualDJ Deck 1 can be routed to this Channel when the switcher at the top panel is set to USB position.
Channel 2 (middle-right) :
Audio signal from an analogue line level source (such as a standard CD Player) connected to the CH 2 LINE inputs at the rear panel can be inserted and processed by the mixer when the switcher at the top panel is set to Line position.
Audio signal from VirtualDJ Deck 2 can be routed to this Channel when the switcher at the top panel is set to USB position.
Channel 4 (far right) :
Audio signal from an analogue line level source (such as a standard CD Player) connected to the CH 4 LINE inputs at the rear panel can be inserted and processed by the mixer when the switcher at the top panel is set to Line position.
Audio signal from an analogue turntable source connected to the CH 4 PHONO inputs at the rear panel can be inserted and processed by the mixer when the switcher at the top panel is set to Phono position.
Audio signal from VirtualDJ Deck 4 can be routed to this Channel when the switcher at the top panel is set to USB position.
Notes :
- Each time a different source is selected from the top switchers, the audio signal of other sources on the same channel will be muted.
- Switch between various sources is smooth, providing the ability of back-to-back dj changeover.
- When the corresponding channels are set to USB position and there are two computers connected on the DDJ-RZ, the USB A/B buttons on the top of the mixer allow smooth transitions between different DJ's. When one of the USB A/B buttons is pressed for one of the sides of DDJ-RZ then both of that side channels are muted for the computer that has not the control anymore.
Internal VS. External Mixing when connected to a Computer DJ Application.
Pioneer DDJ-RZ offers two different modes of routing and mixing the audio when used by a Computer DJ Application such as VirtualDj.
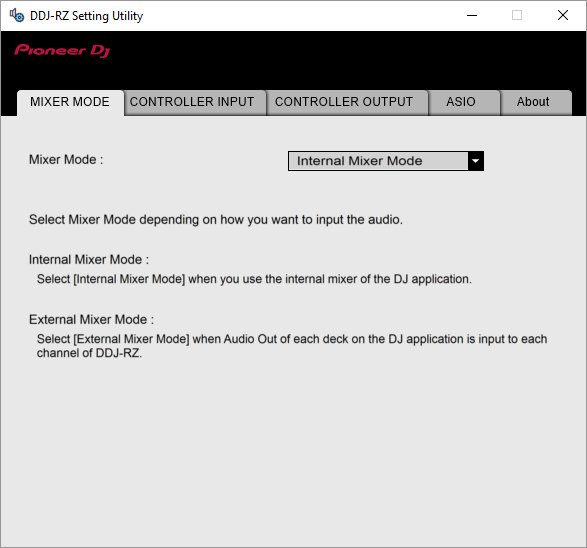
The default mixing mode is the "Internal Mixer Mode" where the sound is mixed by the DJ Application and routed directly on the Master Output Bus of the controller.
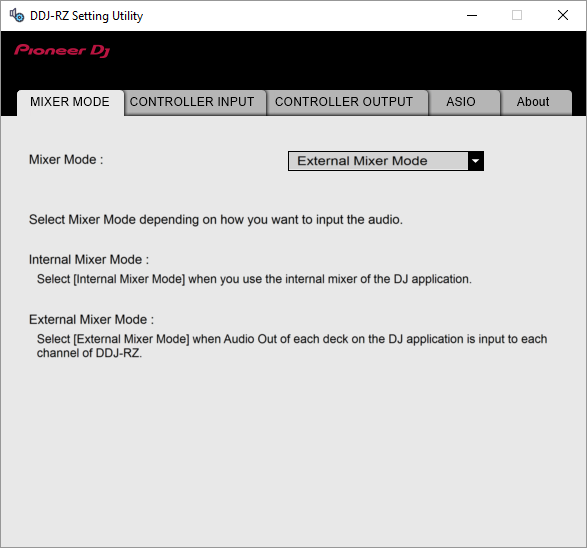
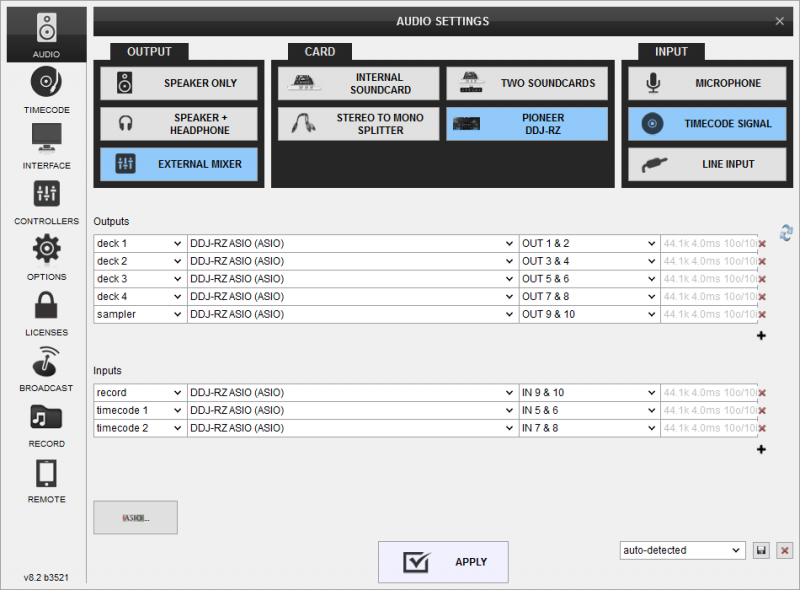
The other mode is "External Mixer Mode" where the sound of each deck on VirtualDj is routed on a separate Channel Bus of DDJ-RZ and the mixing of the audio is done by the hardware of the controller in a similar way of mixing analogue source signals.
To change the Mixer Mode of the device you need to use Pioneer's own "DDJ-RZ Setting Utility" application that get's installed on your system automatically along with it's drivers:
Using External Mixer Mode
In order to use External Mixer Mode with DDJ-RZ you need to perform 3 steps:
Set the unit to "External Mixer Mode on Pioneer's "DDJ-RZ Setting Utility"
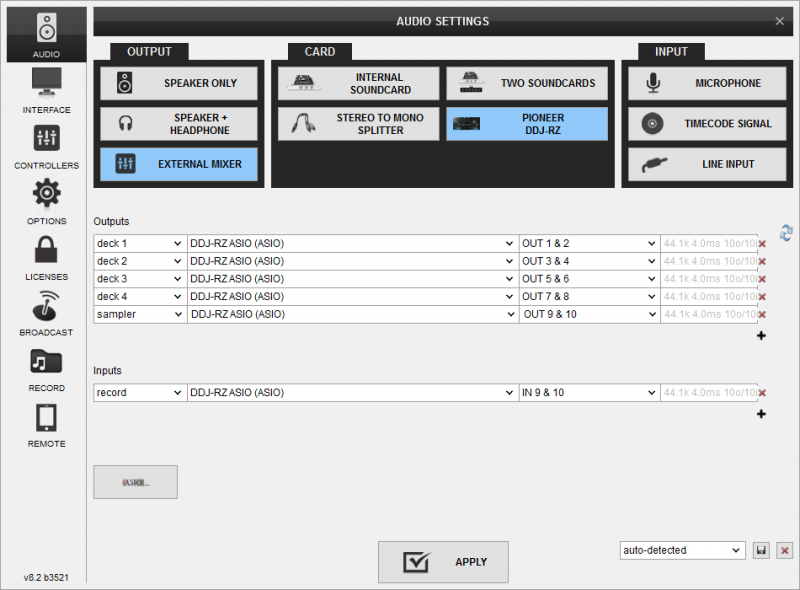
Create the following sound setup:
Select the alternative mapping for External Mixer Mode on Mappers tab:
Recording & Broadcasting
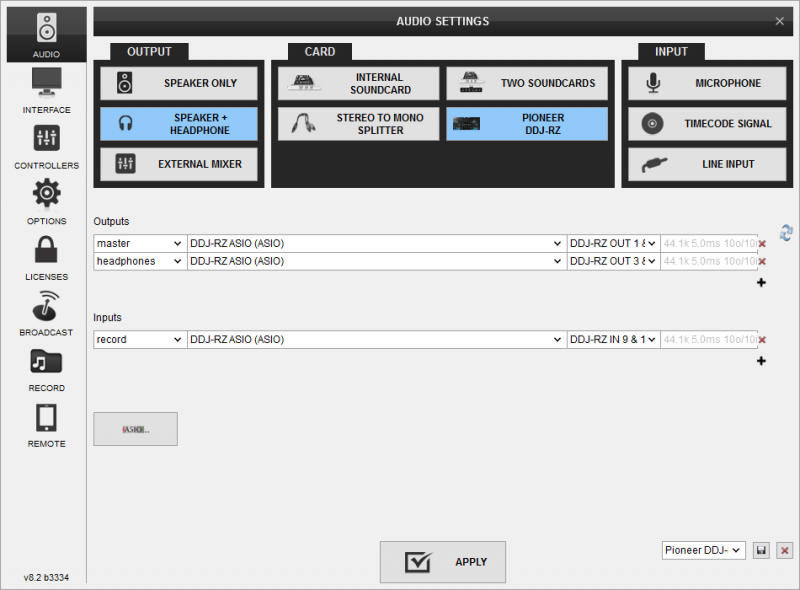
The unit offers the ability to record the Master Output along with the Microphone and LINE Inputs directly from VirtualDJ record button (in the MASTER center panel). The dedicated Recording input channel is already pre-configured, so no further adjustments need to be done.
The recorded output includes any source routed to the Mixer, including analogue media sources connected to the LINE or PHONO Inputs when the top switchers are set to the relative position.
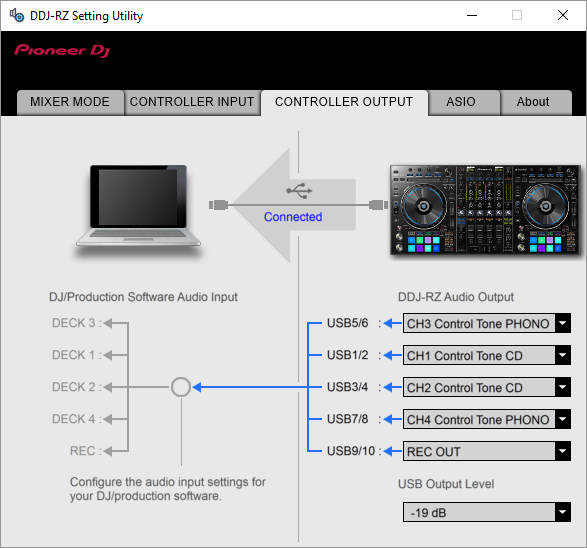
Since the audio to be recorded is coming from the USB sound interface of DDJ-RZ, the sound level of your recording will depend on the "USB Output Level" setting of DDJ-RZ Setting Utility. By default it's set to -19db, which is a value that provides enough headroom for mixing with all 4 channels combined with effects, e.t.c. We recommend to use the default value and use a post-processing software to boost the levels of your recordings if you need to do so.
Timecodes (DVS)
DDJ-RZ offers DVS (Timecoded CDs and Vinyls) Support.
Depending on whether you use Timecode Vinyl (Turntables) or Timecode CDs (CD Players) please perform the following steps:
- Connect your Turntables to LINE 3 and/or LINE 4. If you use CD Players connect them to LINE 1 and/or LINE 2 Inputs.
- Place the Input switches on the top panel to USB position for the related Mixer Channels
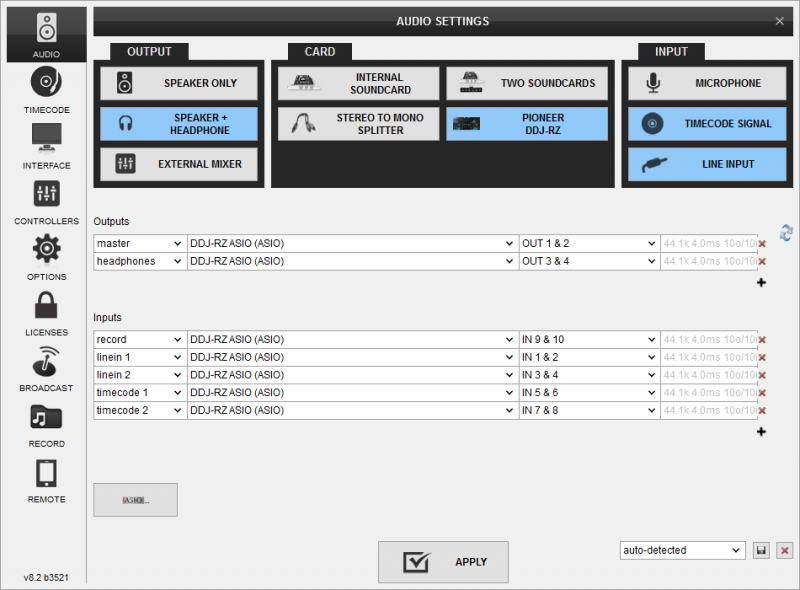
- Open VirtualDJ Settings ->AUDIO tab ans press the TIMECODE SIGNAL button from the INPUT tab
- Select the correct audio channels:
For Turntables use 5&6 for Channel 3 and 7&8 for Channel 4
For CD Players use 1&2 for Channel 1 and 3&4 for Channel 2 - Click to APPLY
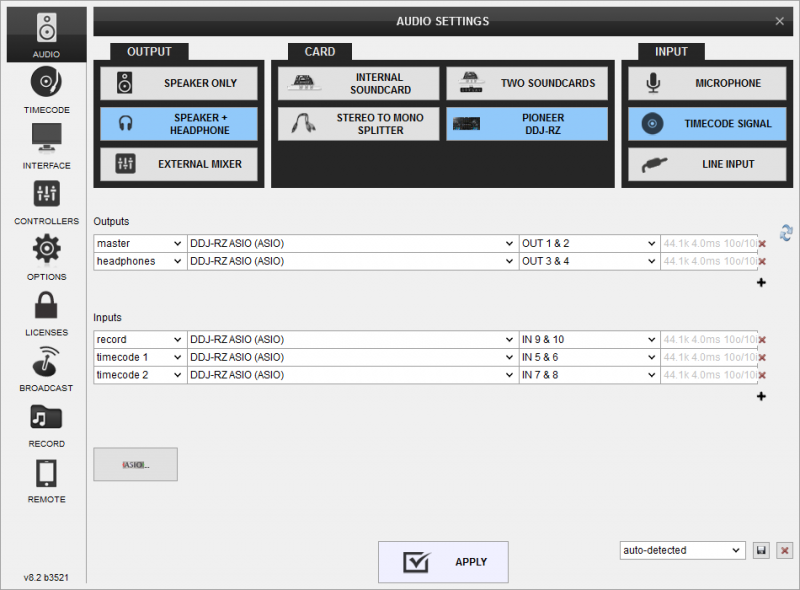
Use the TIMECODE On/Off buttons that will be offered on the Decks (or in the SCRATCH panel for the 4 Decks default VirtualDJ GUI) to enable/disable Timecode control or use the Timecode signal to control a different Deck (e.g. swap Timecode control for Left decks when the 4 Decks GUI is selected)
For Timecode CD's the unit also offers you the ability to connect them in Inputs 3 & 4 instead of turntables. In order to do so please open the "DDJ-RZ Setting Utility", click on the "CONTROLLER OUTPUT" tab and switch "USB5/6" Output from "CH3 Control Tone PHONO" to "CH3 Control Tone CD". Repeat the same procedure for "USB7/8" Output and change from "CH4 Control Tone PHONO" to "CH4 Control Tone CD"

LINE INS
The LINE Inputs 1 and 2 can be also used to send audio signal from an analogue media source connected at the rear panel to VirtualDJ for processing.
- Connect your analogue media devices to LINE 1 and/or LINE 2
- Place the Input switches on the top panel to USB position on Mixer Channels 1 and/or 2
- Open VirtualDJ Settings ->AUDIO tab and press the LINE INPUT button from the INPUT tab
- Click to APPLY
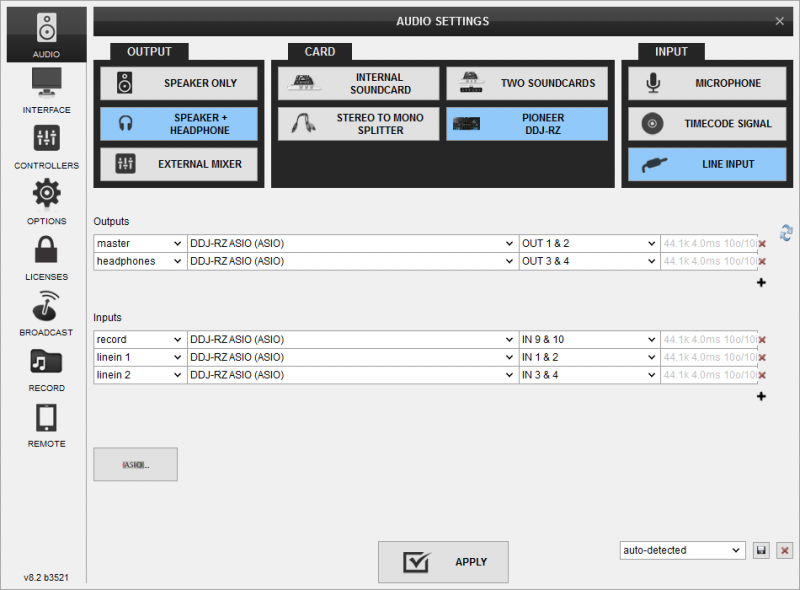
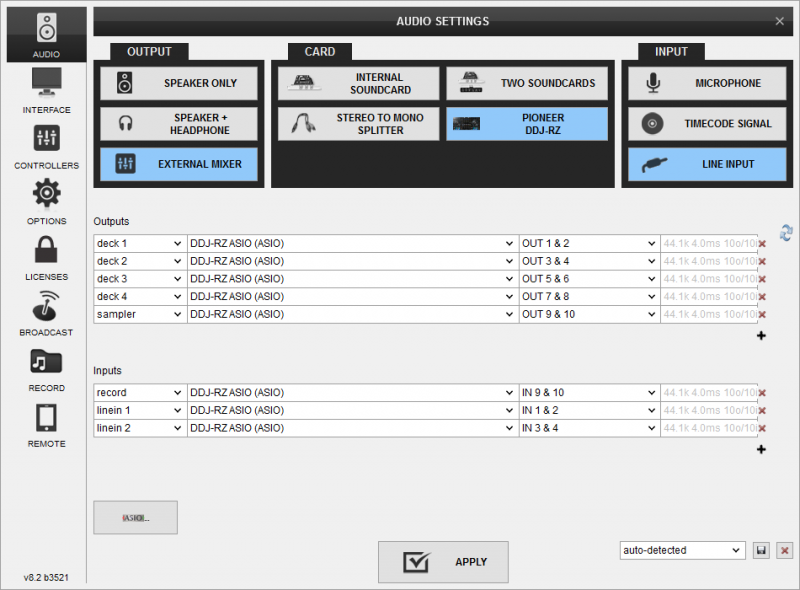
Use the LINE IN On/Off buttons that will be offered on the Decks (or in the SCRATCH panel for the 4 Decks default VirtualDJ GUI) to enable/disable Line In routing to a VirtualDJ deck.
This will provide the ability to synchronize BPM with other decks, use Effects etc.
TIMECODES & LINE INPUTS AT THE SAME TIME
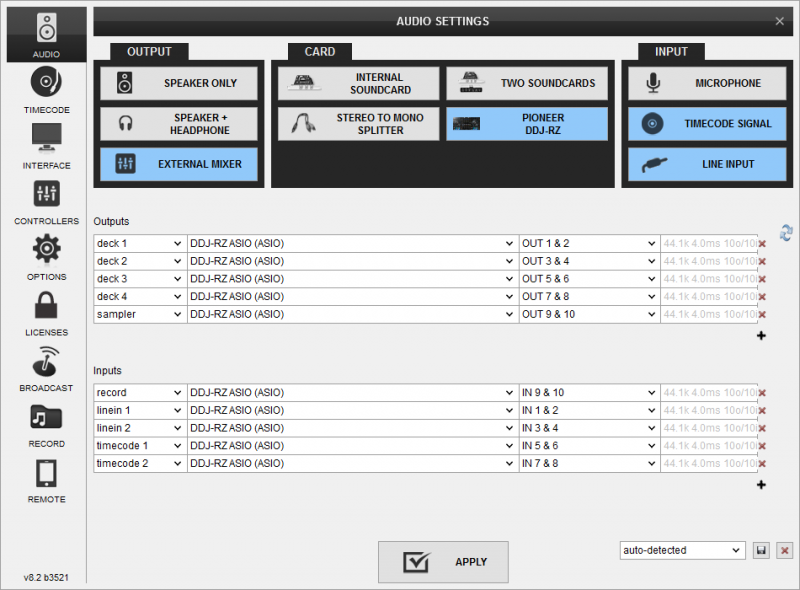
It is possible to use both Timecodes and Line Inputs at the same time.
- Connect your analogue media devices to LINE 1, LINE 2, LINE 3 and LINE 4 Inputs as described on the chapters above.
- Place the Input switches on the top panel to USB position on all Mixer Channels
- Open VirtualDJ Settings ->AUDIO tab and press both LINE INPUT and TIMECODE SIGNAL buttons from the INPUT tab
- Click to APPLY
MICROPHONE INPUTS
DDJ-RZ offers 2 Microphone Inputs and Level/EQ controls from the top panel. Both audio signals from these inputs are directly routed to the Master Output of the unit.
The Microphone inputs are not part of the USB Audio interface, so these cannot be added in VirtualDJ Audio setup and will not control the software Microphone section in the MASTER panel of VirtualDJ GUI and vice versa.
However, as mentioned in the Recording section, both Microphone Inputs can be recorded via the REC button of VirtualDJ via the dedicated recording input channel of the Audio interface.


