Sixty Four
Browser & Deck Controls

- DECK SELECT. The center channels of the Sixty-Four are wired to Decks 1 and 2 and the outside channels are wired to Decks 3 and 4.
Press the DECK 3/1 button to assign the left-side control strip to Decks 1 or 3 (the CONTROL leds on the top panel of the Rane Sixty-Four will indicate the selection).
Press the DECK 2/4 button to assign the right-side control strip to Decks 2 or 4 (the CONTROL leds on the top panel of the Rane Sixty-Four will indicate the selection). - TAB. Use this button to set focus to the Folders List of VirtualDJ Browser. If focus is on the Folders List, use this button to open/close sub-folders.
Hold SHIFT down and then use this button to set focus to the next Browser window (Folders, Songs and Sideview) - SCROLL/LOAD. Use this encoder to scroll through files or folders (depending on the focused Browser window). Hold SHIFT down and then use this encoder to cycle through the available views of the Sideview (Automix, Sidelist, Sampler, Karaoke and Shortcuts).
- LOOP ENC. Use this encoder to half or double the size of a loop. Hold SHIFT down and use the encoder to move the triggered loop forward or backwards by half the selected size of the loop.
Push the encoder to trigger a loop of a selected size in beats. - LOOP BUT. Smart button to trigger a manual loop. Press the button once to set a Loop In (entry) point. Press again, to set a Loop Out (Exit) point and trigger the loop. Press for a 3rd time to exit the loop.
- ROLL. Press and keep this button down to trigger a Loop Roll of a selected size in beats. The size can be adjusted while the button is pressed with the Loop encoder. Size will be memorized for next time and can differ from the size of regular loops.
- SLIP. Use this button to enable/disable the Slip Mode. When Slip mode is enabled, several functions such as scratching, HotCues, loops etc. will act temporary and the track will return to the position it would have been if the action was never triggered
- SYNC. Use this button to synchronize the tempo and phase of this deck with the Master Deck. The Master Deck is smart-selected by VirtualDJ (in most cases it will be the deck that plays out live), but can be manually set as well using the M buttons from the VirtualDJ GUI.
- BANK. Use this button to toggle between the 2 available Banks for the 4 numbered buttons.
- BUTTONS (1-8). The 4 numbered buttons offer different functionality, depending on the selected Bank and Layer.
- LAYER. 4 different Layers (HotCues, Sampler, Saved Loops and Quick Loops – see below) are offered for the numbered buttons. Hold this button down and then press one of the 4 numbered buttons to select a different Layer.
Note that all the above deck controls (TAB, SCROLL, LOOP, SYNC and SLIP) can offer different functionality depending on the selected Layer (as they offer separately named Keys), however those have been pre-assigned to offer the same function regardless the selected layer. This may be changed by customizing the assigned actions. - PHONES SOCKET. Connect your Headphones to this socket
HotCues (Layer 1)
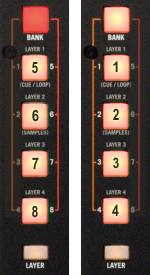
In this mode, each one of the 4 numbered buttons triggers a HotCue (1-8) or assigns a HotCue if not assigned at the track’s current position.
When a Hot Cue Button is unlit (dimmed amber), you can assign a Hot Cue Point by pressing it at the desired point in your track. Once it is assigned, the Hot Cue Button will light up bright amber.
When Bank 1 is selected (BANK Led orange), use these buttons to control HotCues 1 to 4.
When Bank 2 is selected (BANK Led red), use these buttons to control HotCues 5 to 8.
Hold SHIFT down and then use these buttons to delete the assigned HotCues.

Sampler (Layer 2)
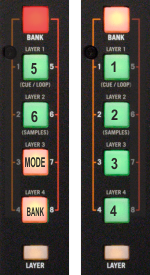
In this mode each the numbered buttons can trigger up to 12 samples from the selected Sampler Bank of VirtualDJ.
The leds of those buttons will be turned off if the corresponding slot is unloaded, dark green if loaded and bright green if playing
When Bank 1 is selected (BANK Led orange), use these buttons to trigger Samples 1 to 4.
When Bank 2 is selected (BANK Led red), use the first 2 top buttons to trigger Samples 5 to 6.
If a Sampler Bank has more than 6 samples, the left side of the Sixty-Four will control samples 1 to 6 and the right side will control samples 7 to 12. If a Sampler Bank has less than 7 samples, both sides will control the same samples.
Depending on the selected Trigger mode, hold SHIFT and then use the same buttons to stop the playing sample.

Use the numbered button 8 (in Bank 2) to select and load the next Sampler Bank. Hold SHIFT down and then use the same button to select and load the previous Sampler Bank.
Use the numbered button 7 (in Bank 2) to select the next Sampler trigger mode. Hold SHIFT down and then use the same button to select the previous trigger mode.
Sampler Output Channel.
By default VirtualDJ will send Sampler to all 4 Channels. You may explicitly route Sampler to a specific deck using the Sampler Options from VirtualDJ GUI, providing the ability to apply Effects, adjust the EQ and control its Output volume from the Sixty-Four.
Saved Loops (Layer 3)
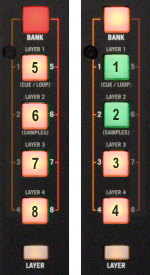
In this mode each the numbered buttons stores and triggers (if saved) a Saved Loop. Up to 8 Saved Loops can be stored and recalled, depending on the selected Bank.
Use the numbered buttons to save a Loop into one of the 8 available slots. The loop will have the current playing position and the currently selected size in beats. The Led will light bright orange if a Loop is stored.
Hold SHIFT down and then use these buttons to delete a saved Loop.
If a Loop is stored, use the same buttons to trigger the saved Loop (and jump to that position if different from the current). Led sill become bright green while triggered.
Use the LOOP BUT to exit the Loop.
When Bank 1 is selected (BANK Led orange), use these buttons to save and trigger Loop slots 1 to 4.
When Bank 2 is selected (BANK Led red), use these buttons to save and trigger Loop slots 5 to 8.

Quick Loops & Rolls (Layer 4)
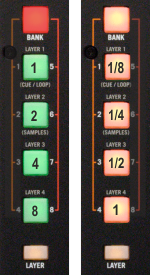
In this mode each the numbered buttons triggers a Loop or a Loop roll of a pre-selected size in beats, depending on the selected Bank.
When Bank 1 is selected (BANK Led orange), each one of the 4 numbered buttons, triggers a momentary Loop Roll of 1, ½, ¼, and 1/8 beats as per the image.
Leds will become bright amber while the corresponding Loop Roll is triggered.
When Bank 2 is selected (BANK Led red), each one of the 4 numbered buttons, triggers a Loop of 1, 2, 4 and beats as per the image.
Leds will become bright green while the corresponding Loop is triggered.

Effects


