Scratch
CONTROLS

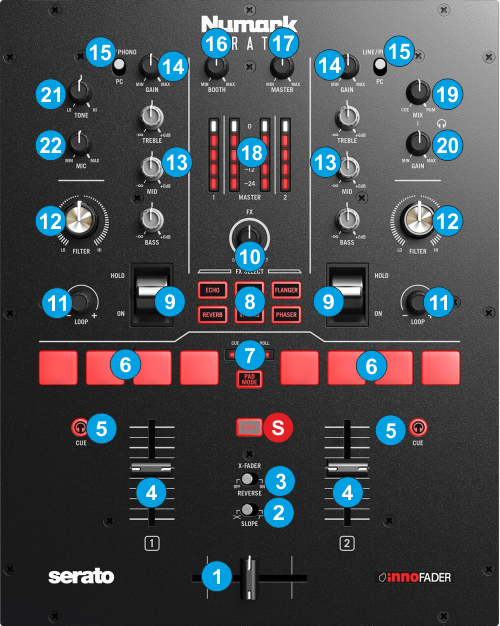
- CROSSFADER. Blends audio between the left and right assigned channels/decks.
- X-FADER SLOPE. Select the slope (curve) for the Crossfader. Choose between Smooth (left position) and Scratch (right position). Other pre-defined or custom crossfader curves can be selected from VirtualDJ Settings.
- X-FADER REVERSE. Set the crossfader to Reverse (ON position) or Normal (OFF position). When in Reverse, the crossfader will blend left and right assigned decks in reverse.
- VOLUME. Use these faders to adjust the Output Volume of each mixer channel.
- CUE. Use these buttons to send a single (toggle behavior) channel's pre-fader signal to the Headphones Channel for monitoring. When engaged, the button will be lit. Press both buttons at the same time to send both channels to the Headphones channel
- PADS 1-4.. Use the 4 buttons to trigger Pads 1 to 4 of the selected Pads page. Hold SHIFT down and then press the same buttons to trigger the assigned action of the selected Pads page. Operation depends on the selected Pads page. See further details at http://www.virtualdj.com/manuals/virtualdj/interface/decks/decksadvanced/pads.html
- PAD MODE.. Use this button to cycle through the pre-defined Pad modes (Hotcues, Sampler and Loop Rolls). Each time a mode is selected, the respective led will lit above the button and the relative Pads page will be loaded on both Decks. Note that other Pad modes (pages) can be loaded from the VirtualDJ GUI. . See further details at http://www.virtualdj.com/manuals/virtualdj/interface/decks/decksadvanced/pads.html
- FX SELECT. Use these buttons to select a VirtualDJ Effect. Selection applies on both decks. The pre-defined Effects for these buttons are Echo, Delay, Flanger, Reverb, Cut and Phaser.
- FX HOLD/ON. Use latch switches to trigger the selected Effect on Left/Right deck. Move up to enable and back to middle position to disable. Move and hold at the bottom position to temporary enable the Effect and release to disable.
- FX DRY/WET. Use this knob to adjust the 1st Parameter of the selected Effect. The adjustment applies to both Left and Right assigned decks. Hold SHIFT and then use the same knob to adjust the 2nd Parameter of the selected Effect
- LOOP. Use this encoder to select the size of the loop in beats. Push the encoder to enable/disable a loop of the selected size in beats.
Hold SHIFT and use the encoder to scroll through files or forders, depending on the selected Browser window (folders, songs, sideview). Hold SHIFT and then push the encoder to load the selected track to the Left/Right deck. While SHIFT is held, double-fast push the encoder to load (clone) the track from the other deck to the Left/Right deck - FILTER.. Use these knobs to apply a High/Low-Pass Filter. When at middle (12'o clock position), no Filter is applied and the LED will be off.
- EQ HIGH/MID/LOW. Use these knobs to adjust the low (bass), middle (mid) and high (treble) frequencies of each mixer channel.
- GAIN. Adjusts the input audio level (gain) up to +9db of each mixer channel. No boost or cut is at 12 o’clock position.
- INPUT SELECT LINE/PC. Set to PC position to route left/right VirtualDJ deck to the left/right mixer channel. Set this selector to LINE to route the audio signal from an external audio source (connected at the rear panel) to the left/right mixer channel.
Set to PC position if you are using a DVS (Timecode) system. - BOOTH VOLUME * Use this knob to control the Output level of the Booth Output (connection at the rear panel)
- MASTER VOLUME *. Use this knob to adjust the Output level of the Master Output.
- VOLUME METERS. The 2 middle series of leds indicate the output level of the Master Output. The left/right series of leds indicate the pre-fader output level of the left/right mixer channel.
- CUE MIX. Use this knob to mix between CUE and Master MIX in the Headphone channel. When all the way to the left, only channels routed to Headphones (via the CUE buttons) will be heard. When all the way to the right, only the Program mix will be heard.
- CUE GAIN *. Use this knob to adjust the output volume of the Headphones Channel
- MIC TONE**. Use this knob to adjust the Tone of the Microphone input signal (connection at the rear panel)
- MIC VOLUME**. Use this knob to adjust the volume of the Microphone input (connection at the rear panel)
* Hardware knobs, not sending any MIDI, so can't be assigned to any VDJ script action nor will control any element on VirtualDJ skins.
** Hardware knobs, not sending any MIDI, so can't be assigned to any VDJ script action. Note that the Microphone input is not part of the USB Audio interface so has nothing to do with the Microphone controls in the MASTER panel of the default VirtualDJ skins.
Front & Rear panels


