Mixtrack Pro II
LOWER PADS
The lower 4 PADs (27) of the Mixtrack II offer Loop, Sampler and HotCues controls depending on the selected mode
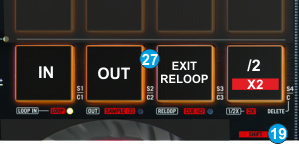
Manual Loop mode
 Hold SHIFT down and then press the 1st PAD from left to set the lower PADs to Manual Loop mode. The small orange led right below the 1st PAD will be lit to indicate the selected mode.
Press the 1st PAD to set a Loop In (Entry) point and then press the 2nd PAD to set the Loop Out (Exit) point and trigger a manual loop.
If a Loop is enabled press the 1st or 2nd PADs to set the Jogwheel to Loop In or Loop Out Adjust mode and then use the jogwheel to fine adjust the Entry and Exit points of the Loop. The Leds of the PADs will blink to indicate the selected mode.
Either press the same PADs or exit the Loop in order the jogwheel to return to the Jog mode.
Use the 3rd PAD to exit the Loop (if triggered) or trigger the last enabled Loop (re-loop).
Press the 4th PAD to half the size of the Loop or hold down SHIFT and then press the same PAD to double its size.
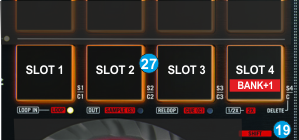
Sampler mode
 Hold SHIFT down and then press the 2nd PAD from left to set the lower PADs to Sampler mode. The small orange led right below the 2nd PAD will be lit to indicate the selected mode.
Each one of the 4 lower PADs (27) will trigger a Sample from the selected Bank of VirtualDJ. If the selected bank has less than 5 samples (slots), both sides of the Mixtrack II will control the same samples. If a bank has more than 4 samples (slots), the left side of the Mixtrack II will control samples 1 to 4 and the right side samples 5 to 8.
The Leds of the 4 PADs will be lit if a Sampler slot is loaded and will blink if the slot is playing.
Hold SHIFT down and then press the 4th PAD from left to select and load the next available Sampler Bank.
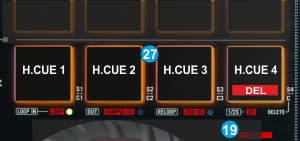
HotCues mode
 Hold SHIFT down and then press the 3rd PAD from left to set the lower PADs to HotCues mode. The small orange led right below the 3rd PAD will be lit to indicate the selected mode.
Each one of the 4 lower PADs (27) assigns a Hot Cue Point (1 to 4) or returns the track to that Hot Cue Point. When a Hot Cue Button is unlit, you can assign a Hot Cue Point by pressing it at the desired point in your track. Once it is assigned, the Hot Cue Button will light. To return to that Hot Cue Point, simply press it.
Hold SHIFT (18) down and then press the 4th PAD from left to enter the Delete HotCue mode. The Leds of the 4 Pads will blink (if a HotCue is assigned). Press the Pads to delete its assigned HotCue. Hold SHIFT and then press the 4th PAD to return to the HotCues mode.
Rear & Side Panels


