AKAI AMX

SETUP
Drivers
Windows: Install the necessary drivers from http://www.akaipro.com/index.php/product/amx#downloads
Mac OSX: No drivers are required to be installed for Mac computers.
Firmware
No firmware is available at the time this manual is written.
.
VirtualDJ 8 Setup
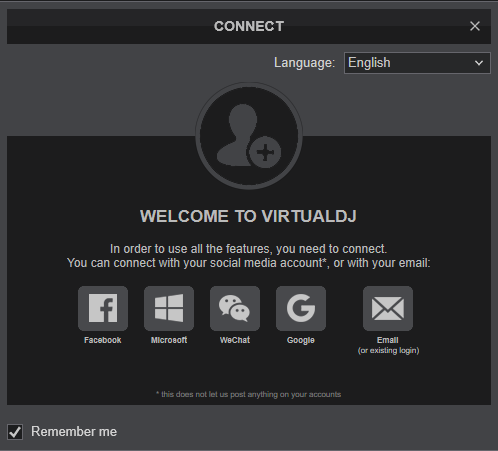
Once VirtualDJ 8 is launched, a Login Window will appear. Login with your virtualdj.com account credentials.
A Pro Infinity, a PLUS or a Pro Subscription License is required to use the AKAI AMX. Without any of the above Licenses, the controller will operate for 10 minutes each time you restart VirtualDJ.
http://www.virtualdj.com/buy/index.html
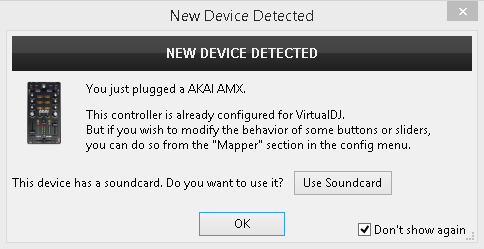
The unit is now ready to operate.
Advanced Setup
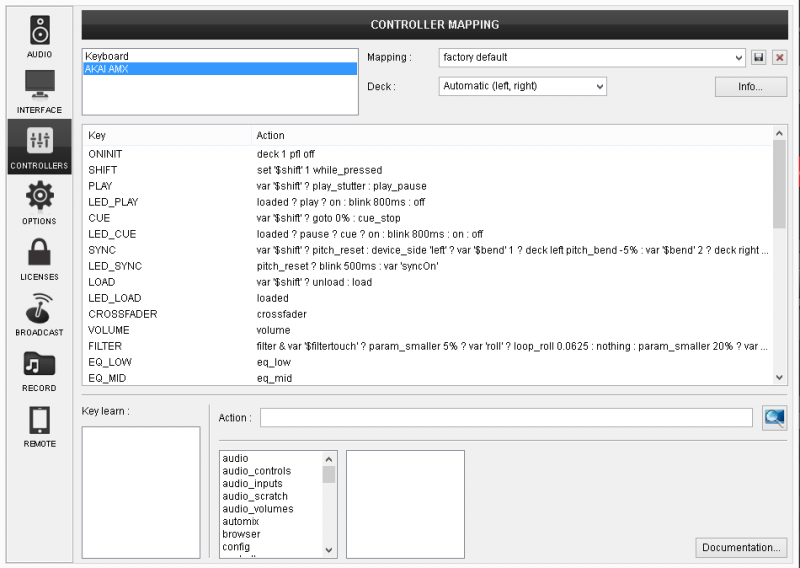
The unit should be visible in the CONTROLLERS tab of Config and the “factory default” available/selected from the Mappings drop-down list.
The factory default Mapping offers the functions described in this Manual, however those can be adjusted to your needs via VDJ Script actions.
Find more details at
http://www.virtualdj.com/wiki/VDJ8script.html
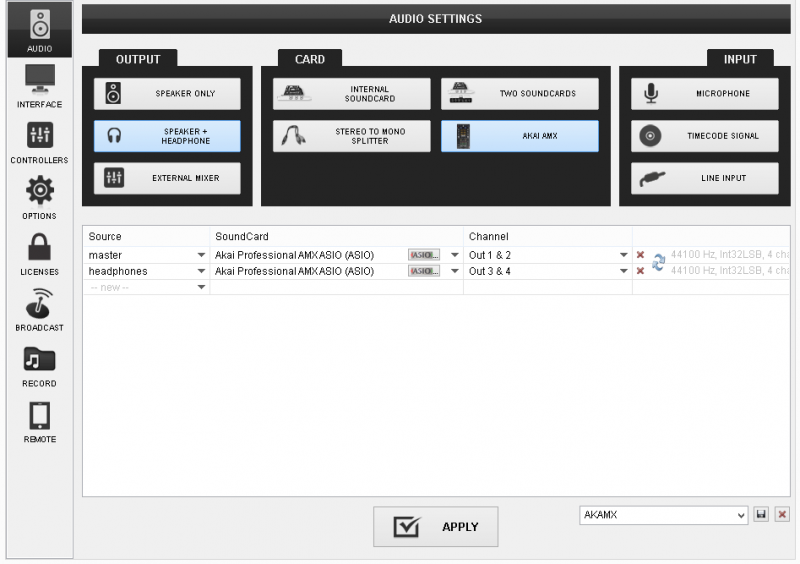
The unit has a pre-defined Audio setup and a special button in the AUDIO tab of Config to provide that. Alternative Audio setups can be applied in the same window.
Timecode (DVS)* configuration is also available (see DVS Support ).
*requires Pro Infinity or Timecode License http://www.virtualdj.com/buy/index.html
For further software settings please refer to the User Guide of VirtualDJ 8.
http://www.virtualdj.com/manuals/virtualdj8/index.html
CONTROLS
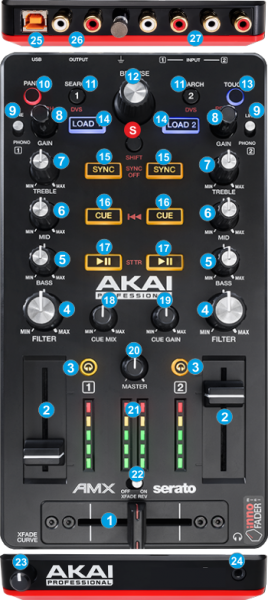
- S. SHIFT. Press and hold this button down to access secondary functions (in red lettering) of other controls on the AMX
- CROSSFADER. Blends audio between the left and right channels/decks.
- VOLUME. Use these faders to adjust the Output Volume of each mixer channel.
- PFL. Press these buttons to send this channel's pre-fader signal to the Cue Channel for monitoring. When engaged, the button will be lit. By pressing one PFL button at a time, you will cue that channel alone (and deactivate PFL monitoring for the other channels). To cue to both channels simultaneously, press both PFL buttons at the same time.
- FILTER. Applies a High-Pass / Low-Pass Filter on the software decks.
If the Touch mode is enabled, the knob will apply a Loop Roll along with the Filter. The size of the loop roll starts from 1/2 beat (center position) and ends to 1/16 beat (left or right end position) - EQ LOW. Adjusts the low (bass) frequencies of each mixer channel. When Touch mode is activated and the knob is touched, it will mute the corresponding channel's low frequencies (aka "EQ kill") *.
- EQ MID. Adjusts the middle (mid) frequencies of each mixer channel. When Touch mode is activated and the knob is touched, it will mute the corresponding channel's mid frequencies (aka "EQ kill") *
- EQ LOW. Adjusts the low (bass) frequencies of each mixer channel. When Touch mode is activated and the knob is touched, it will mute the corresponding channel's low frequencies (aka "EQ kill") *.
*Note. By default the EQ of VirtualDJ 8 is not set to Full Kill Mode. You may change that from the Options tab of Settings. - GAIN. Adjusts the audio level (gain) of the left and right mixer channel.
Hold SHIFT down and then use these encoders to adjust the tempo (pitch) of each deck. - LINE/PHONO. Flip this switch to the appropriate position, depending on the connected device to the Line/Phono Inputs (27). If you are using phono-level turntables, set this switch to Phono to provide the additional amplification needed for phono-level signals. If using a line-level device, such as a CD player or sampler, set this switch to Line
- PANEL. Use this button to cycle through the available center panels of the default skins of VirtualDJ (Mixer, Video, Scratch and Master).
Hold SHIFT down and then use this button to open/close the Sideview window of Browser. - SEARCH. Press and keep this button down and then use the BROWSE encoder to navigate (seek) through the loaded track of left or right deck respectively.
Press and keep this button down and then use the SYNC buttons to temporary slow-down or speed-up the tempo (pitch bend) of the left or right deck respectively. - BROWSE. Scrolls through Folders or Files.
If a SEARCH buttons is held down, the encoder will navigate (seek) through the loaded track of left or right deck.
BROWSE PUSH. Push the encoder to toggle focus between the Folders and the Songs List of Browser.
If focus is on the Folders List, hold SHIFT down and then push the encoder to expand/collapse sub-folders.
If focus is on the Songs List, hold SHIFT down and then push the encoder to add the selected track to the Automix list of Sideview. - TOUCH. Use this button to enable/disable the Touch mode. If Touch mode is enabled, the Filter knob will apply a Loop Roll and the EQ knobs will offer Kill actions when touched.
The BROWSE and the GAIN encoders will offer Touch MIDI keys as well (not assigned to any function by default) - LOAD. Press this button to load the selected track from the Browser to the left or right deck. Hold SHIFT down and then press this button, to unload the same deck.
- SYNC. Press this button to automatically match the corresponding Deck's tempo with the opposite Deck's (or the Master Deck’s if using a 4 decks Skin) tempo and phase.
Hold SHIFT down and press this button to smoothly reset the Pitch (Tempo) of the track to its original value.
Hold the left or right SEARCH button down and then use these buttons to temporary slow-down or speed-up the tempo (pitch bend) of the left or right deck respectively. - CUE. When the Deck is paused, you can set a temporary Cue Point at the current position of the track.
During playback, you can press the Cue Button to return the track to this Cue Point. (If you did not set a Cue Point, then it will return to the beginning of the track.).
If the Deck is paused at the Cue point, you can press and hold the Cue Button to play the track from the Temporary Cue Point. Releasing the Cue Button will return the track to the temporary Cue Point and pause it. To continue playback without returning to the Temporary Cue Point, press and hold the Cue Button, then press and hold the Play Button, and then release both buttons.
Press and hold SHIFT and then press this button to return to the beginning of the track. - PLAY. Plays / Pauses the track. Hold SHIFT down and then press this button to "stutter-play" the track from the last set Cue Point.
- CUE MIX: Use this knob to mix between Cue and Program in the Headphone channel. When all the way to the left, only channels routed to Cue (via the PFL buttons) will be heard. When all the way to the right, only the Program mix will be heard.
- CUE GAIN. Adjusts the volume level of the headphone output.
- MASTER VOLUME: Adjusts the Master Output Volume.
- VU METERS. The Bar Leds will indicate the output level of the left, right and Master Channel.
- XFADE REV. Use this switcher to reverse the direction of the crossfader.
- XFADE CURVE. Adjusts the slope of the crossfader curve. Turn the knob to the left for a smooth fade (mixing) or to the right for a sharp cut (scratching). The center position is a typical setting for club performances.
- HEADPHONES SOCKET. Connect your 1/8" headphones to this output for cueing and mix monitoring.
- USB. This USB connection sends and receives audio and control information from a connected computer. The AMX is USB powered.
- MASTER OUTPUT: Use standard RCA cables to connect this output to a speaker or amplifier system. The level of this output is controlled by the Master knob on the top panel.
- LINE INPUTS. Connect your audio sources to these inputs. Both Inputs can accept line and phono-level signals.
DVS Support
The AMX is offering DVS (Digital Vinyl System) support with VirtualDJ 8. A timecode Plus or Pro Infinity license is required.
Up to 2 Timecode Inputs can be assigned and control any software decks via Timecode CDs or Vinyls. Both Mixer Channels can accept LINE (Timecode CDs) and PHONO Sources (Timecode Vinyls) depending on the LINE/PHONO switchers at the top panel of the unit.
Connect your Timecode devices at the rear panel of the AMX, open the AUDIO page of VirtualDJ Config and click on the TIMECODE button of the INPUT tab. VirtualDJ will automatically create the following Audio configuration.
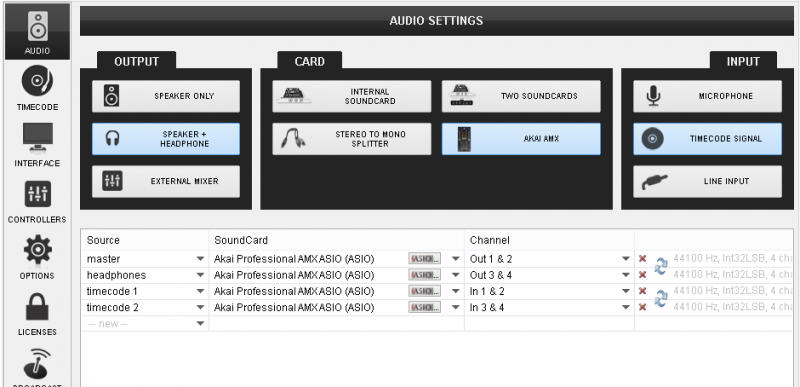
Click to APPLY and then open the newly appeared TIMECODE tab you will see in the Config window. Press PLAY on your timecode CD or Vinyl device and VirtualDJ will automatically detect your Timecode type and make the appropriate adjustments for best performance. Choose the CALIBRATE button if for any reason the signal is not detected (possibly due to reversed phase connections).


